

🤝 Authentication with Dynamic
This page explains how to integrate Dynamic for user authentication and Co:Create for wallet generation.
In this video, Matt from Co:Create shows you a sample app that uses Dynamic authentication. See the section Sample app walkthrough for more details.
Overview
Co:Create offers powerful web3 capabilities like user wallets, token controls, and token distribution, but user authentication is handled externally to the platform. You'll need to select and implement your own authentication solution.
This approach gives you the flexibility to use the best authentication method for your project's unique needs. Plus, by leaving auth to the experts, we at Co:Create can focus on enabling and empowering web3 communities -- while you enjoy top-notch security services from pros like Dynamic.
Co:Create API keys
To make requests to the Co:Create APIs, you need an API key. This key is used to identify and authorize applications so they can call the Co:Create API endpoints. API keys are not used to identify or authorize individual users.
User-level authentication is essential for most apps, to facilitate user-specific features and personalized experiences.
API keys != User authentication
API keys are for apps. Authentication is for individual users.
Co:Create 🤝 Dynamic
Dynamic is a powerful web3 authentication platform that provides simple onboarding flows for all users, as well as advanced login experiences for crypto-native users. Co:Create pairs well with Dynamic: seamless web3 capabilities + streamlined user authentication = personalized experiences for your community.
For an introduction to Dynamic, watch the 10-minute product walkthrough and check out the blog.
Sample app walkthrough
This section uses a sample app to show you how to connect Dynamic and Co:Create. The sample app is built with Next.js, React, Chakra, and TypeScript.
Explore the sample app
- Try the live demo app as you review the steps on this page
- Get the code on GitHub and spin up your own app
Summary
Here's a summary of the Dynamic + Co:Create integration process as implemented in the sample app. Each high-level step is explained in more detail below so you can build your own sample app.
- Set up Dynamic: Register on Dynamic's website, configure email sign-in, and get your Dynamic environment ID and public key.
- Set up Co:Create: Sign up for the Co:Create sandbox and get your API key.
- Connect the Dynamic SDK: Incorporate Dynamic's SDK into your app.
- Use the Dynamic hook: The
useDynamicContext()hook provides authentication methods and states. - Connect Dynamic to the UI: Add a button for initiating the Dynamic authentication flow.
- Generate a wallet with the Co:Create API: Authenticate user JWTs and use Co:Create's API to generate web3 wallets for authenticated users.
- Link Dynamic to the user wallet: Associate the Co:Create wallet address with the Dynamic user profile.
1. Set up Dynamic
To get started, create a Dynamic account. Sign in to Dynamic and make sure Sandbox is selected in the left pane. (The sign-up process takes you to the sandbox environment by default.)
The sample app uses Dynamic's Email sign-in feature. Complete these steps to set up email sign-in:
- In the Dynamic sandbox dashboard, click Configurations in the left pane.
- In the Wallets section of the page, select Sign in with Email or Social.
- Select the No wallet option. Co:Create will provide the user wallet.
Under Order of Appearance, select Email (Web2) only. Turn off all the other options (this should happen automatically).
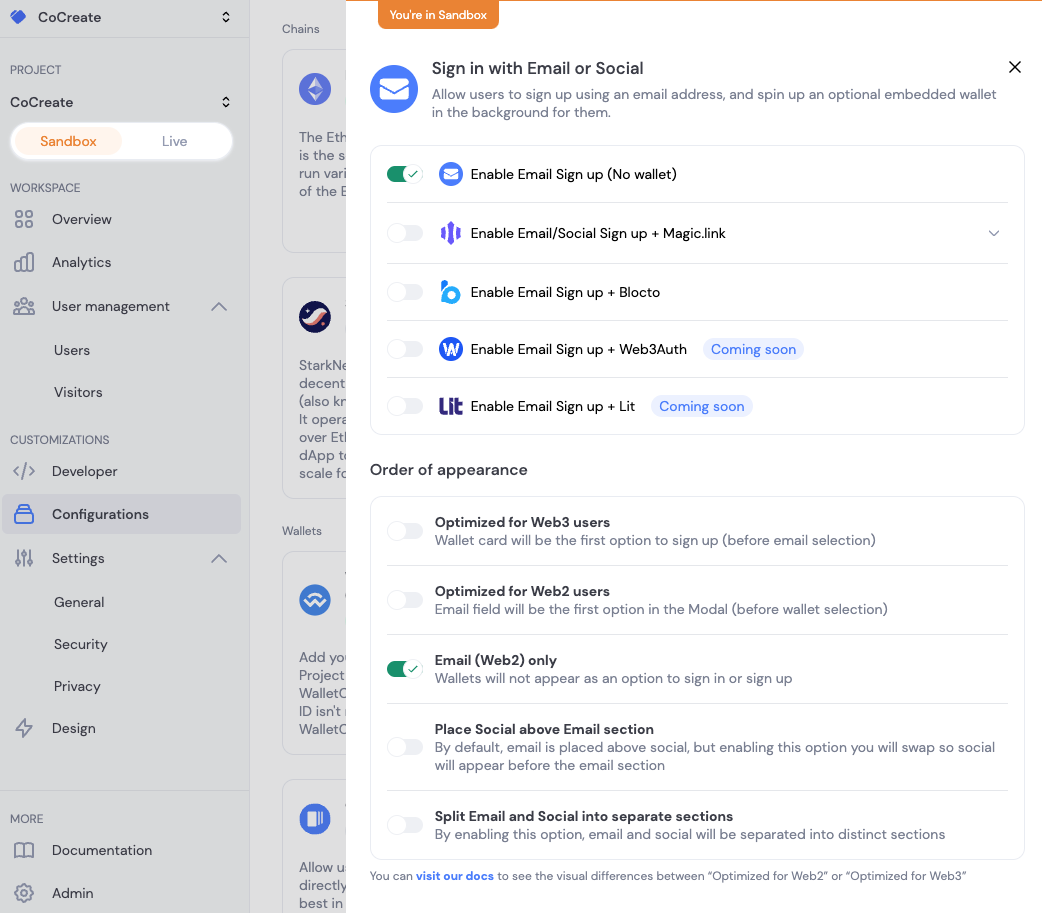
Dynamic configuration: Enable only the “(No wallet)” option
- A prompt appears, asking whether you want to save your changes. Click Yes.
- In the left navigation pane, select Developer. Copy your developer keys (public token and environment ID) and save them. You'll need them in later sections.
- At the bottom of the page, click Create token to create a Dynamic API token. Copy your API token and save it somewhere safe.
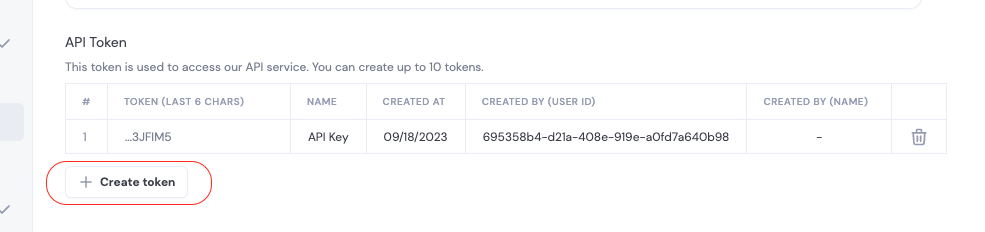
Create a new Dynamic API Token
To learn more about the Dynamic API, explore the detailed, interactive API reference.
2. Set up Co:Create
- Go to the Co:Create sandbox and sign up.
- Click your profile name in the top right corner and select Org Settings.
- Click the API keys tab and create an API Key.
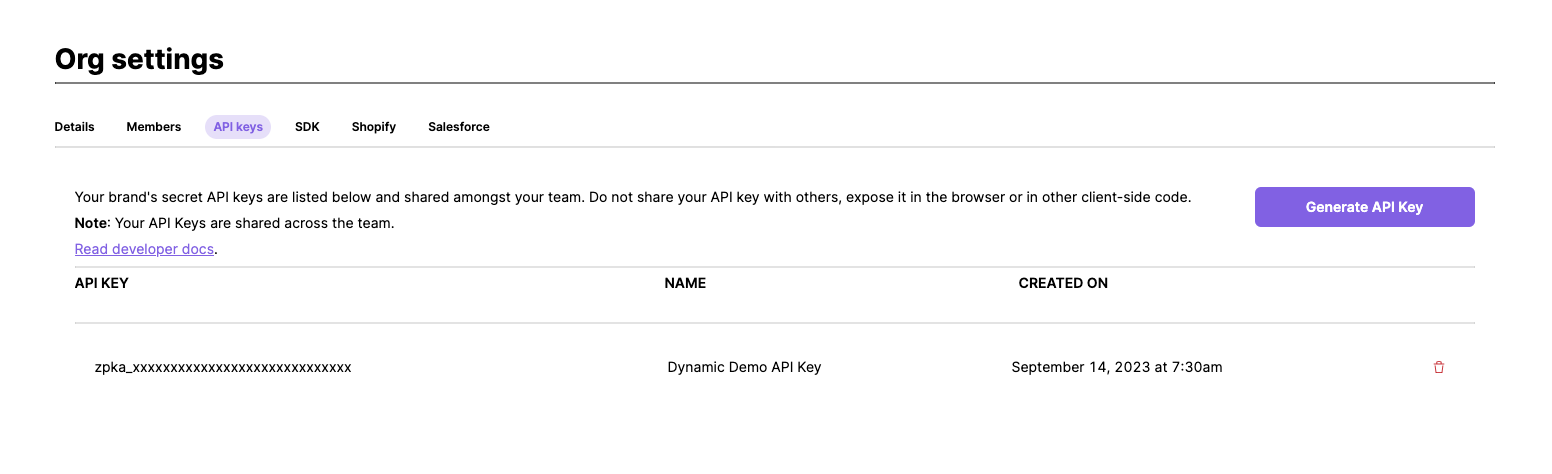
Generate a Co:Create API key in your Org settings
3. Connect the Dynamic SDK
Use the DynamicContextProvider component, to make the SDK available to your app. Make sure it’s as high as possible in the component tree, so that Dynamic is reactable from wherever you need it. In the sample app, the SDK is connected in _app.tsx.
Make sure to replace <environmentID> with your own Dynamic environment ID (see Set up Dynamic).
// src/pages/_app.tsx
import { DynamicContextProvider, DynamicWidget } from "@dynamic-labs/sdk-react";

const App = () => (
  <DynamicContextProvider
    settings={{
      environmentId: <environmentID>,
    }}
  >
    <DynamicWidget />
  </DynamicContextProvider>
);

export default App;
To learn more about Dynamic's React Context, see the DynamicContextProvider docs and the Intro to the Dynamic SDK.
4. Use the Dynamic hook
The useDynamicContext() hook gets all the context your app needs from Dynamic. Explore the available methods and variables in the useDynamicContext docs.
// src/pages/index.tsx
import { useDynamicContext } from "@dynamic-labs/sdk-react";

export default function Home() {
...
const { authToken, handleLogOut, user, isAuthenticated, setShowAuthFlow } =
    useDynamicContext();
...
}
5. Connect Dynamic to the UI
The sample app UI is pretty simple. The app offers a Sign Up or Sign In button for unauthenticated users. The onClick method for this button calls the setShowAuthFlow function provided by useDynamicContext. With just a few lines, you can add a straightforward authentication mechanism to your app.
{!isAuthenticated && (
            <Button colorScheme='purple' onClick={() => setShowAuthFlow(true)}>
              Sign Up or Sign In
            </Button>
)}
Sign Up / Sign in flow
Here are some screenshots of the sample app Sign Up / Sign In flow:
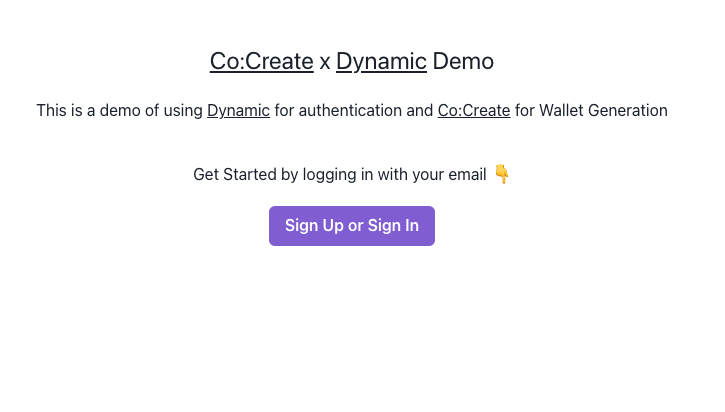
Dynamic button in the sample app
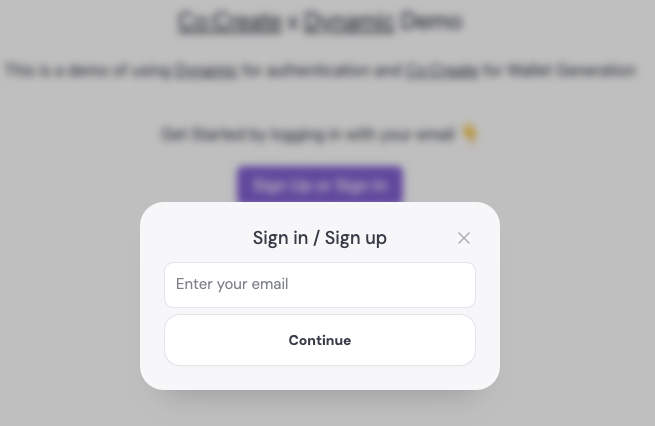
Enter an email to sign up or sign in
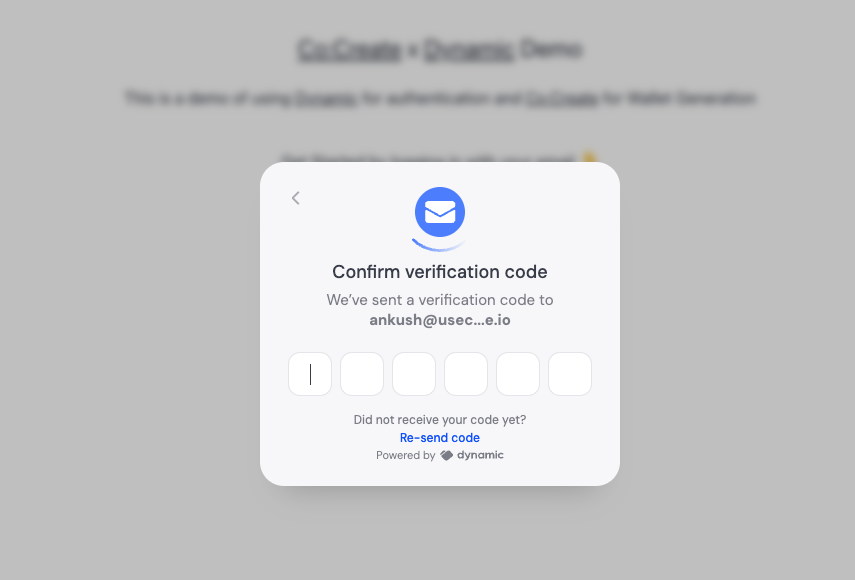
Dynamic verification code
6. Generate a wallet with the Co:Create API
After authenticating a new user with Dynamic, you'll need to create a wallet with the Co:Create Users API.
Protect your Co:Create API key
Co:Create API keys are for use only in application backends. The Co:Create API key should never be exposed in the frontend.
When you authenticate a user, Dynamic responds with a JSON web token (JWT). The following code shows a simple JWT authentication function that validates the Dynamic JWT. The jsonwebtoken package takes the public key and JWT as input, checks that the JWT is valid, and returns the decoded claims.
Make sure to replace PUBLIC_KEY with your public token from the Dynamic developer dashboard (see Set up Dynamic).
// src/auth.ts
import jwt from "jsonwebtoken";

const PUBLIC_KEY = `-----BEGIN PUBLIC KEY-----
MIICIjANBgkqhkiG9w0BAQEFAAOCAg8AMIICCgKCAgEAr3+h1sv4HP5YGxTs+JM6
xxxxxxxxxxxxxxxxxxxxxxxxxxxxxxxxxxxxxxxxxxxxxxxxxxxxxxxxxxxxxxxx
sG1siVpS7+H2EXGxwn5AS58CAwEAAQ==
-----END PUBLIC KEY-----`;

export const authenticateJWT = (token: string) => {
  try {
    const decoded = jwt.verify(token, PUBLIC_KEY);

    if (!(typeof decoded === "object" && "email" in decoded)) {
      throw new Error("Invalid token");
    }

    return decoded;
  } catch (error) {
    console.error(error);
    throw error;
  }
};
The authenticateJWT function verifies that the token is valid and extracts the email address.
Now you can use the email address to create a user via a POST request to the Co:Create Users API. The API response provides the new Co:Create wallet address.
// src/api/create_user.ts

const decoded = authenticateJWT(token);

// Check if decoded is an object and has an email property
if (!(typeof decoded === "object" && "email" in decoded)) {
  return res.status(400).json({ error: "Invalid token" });
}
// Make a request to the CoCreate API to create a user
const options = {
  method: "POST",
  url: "https://api.testcocrt.xyz/alpha/user",
  headers: {
    accept: "application/json",
    "content-type": "application/json",
    Authorization: `Bearer ${process.env.COCREATE_API_KEY}`,
  },
  data: {
    email: decoded.email,
  },
};
// Rest of your code...
const response = await axios.request(options);

return res.status(200).json(response.data);
7. Link Dynamic to the user wallet
You can use Dynamic's Wallet API to associate the Co:Create wallet address with the corresponding Dynamic user profile. This step requires the Dynamic API token you copied in the section Set up Dynamic. Add it to your environment file as DYNAMIC_API_KEY=dyn_XXXXXXXXXXXXXXXXXXXXXXXXXX.
Then use axios to send a POST request to Dynamic to associate the Co:Create wallet address with the Dynamic user profile:
const dynamicOptions = {
  method: "POST",
  url: `https://app.dynamicauth.com/api/v0/users/${dynamic_user_id}/wallets`,
  headers: {
    accept: "application/json",
    "content-type": "application/json",
    Authorization: `Bearer ${process.env.DYNAMIC_API_KEY}`,
  },
  data: {
    chain: "EVM",
    publicWalletAddress: cocreate_wallet_address,
    walletName: "Co:Create Wallet",
    walletProvider: "custodialService",
  },
};

await axios.request(dynamicOptions);
After completing this step, you should start seeing users and their wallet addresses in the user management section of the Dynamic dashboard.

Dynamic usser dashboard showing Co:Create wallet addresses
Learn more
- Try the live demo app
- Get the code on GitHub and spin up your own app
- Explore the Dynamic docs