

📸 Uploading NFT Metadata and Media to IPFS
This guide will show you how to:
Why do I need Media and Metadata files?
Let's provide some context before we dive into the details.
When you create a non-fungible token, you need to have two files hosted off-chain:
- a media file
- a metadata file
These files have to be hosted off-chain because blockchains are not designed to store large amounts of data (storage costs are the highest on EVM blockchains). The blockchain only keeps a record of ownership of an NFT, which points to the metadata file, offloading the storage cost.
Now, let's take a look at the two files:
- The media file: any type/format (picture, audio, video). This is the visual asset your token represents.
- The Metadata file: A JSON file that serves as a descriptor for your token. It enables you to specify the token
name,base_uri, and other attributes of your choosing. If you want to facilitate the discovery of your NFT, it's a good idea to structure your metadata file using a standard scheme. In this article, we'll implement the ERC721 Metadata JSON Schema.
When deploying a ERC-721 contract on Co:Create, a base_uri parameter is required. The base_uri is simply a URI that points to the future contract's metadata file.
- example of metadata
URI: https://nftstorage.link/ipfs/bafybeiasv4llnkervuprzfte5sulodkzobcmpfc7ldwybdwiqq5ywbbstu/0
Clicking the above link will take you to the metadata for a non-fungible token, which contains a link to the media file itself: ipfs://bafybeicm4hja3ty6jq52nsredyluviugp5d5ekos4cy4337cp5adj5aru4/0.jpg
That's a lot to take in! But the process is quite straightforward, and this article will help you show you how to upload your media and metadata files to IPFS and obtain the base_uri that you'll need to deploy your token.
NFTs and IPFS
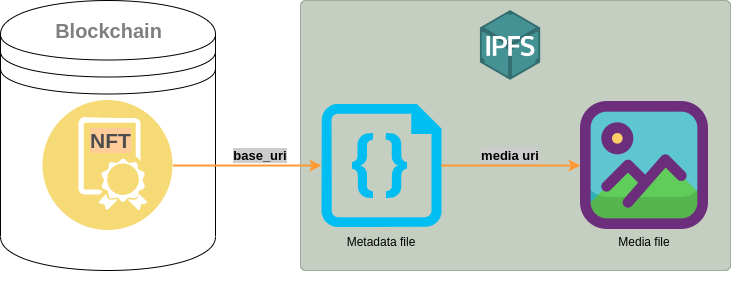
You can store media and metadata files anywhere, but IPFS is the most common choice in the NFTs ecosystem. IPFS is a decentralized storage system.
As you can see in the chart, each NFT is a record of ownership sitting in a blockchain. This record points to a metadata file which points to the media file itself.
Once a file has been uploaded to IPFS, you can "pin" the file in IPFS to ensure it stays available. There are providers which offer to maintain your files on IPFS. Here are a few of those pinning services:
Here, we'll use NFT Storage for its convenience.
Setting up NFT Storage
- Sign up or log into NFT Storage website and copy/save your API key
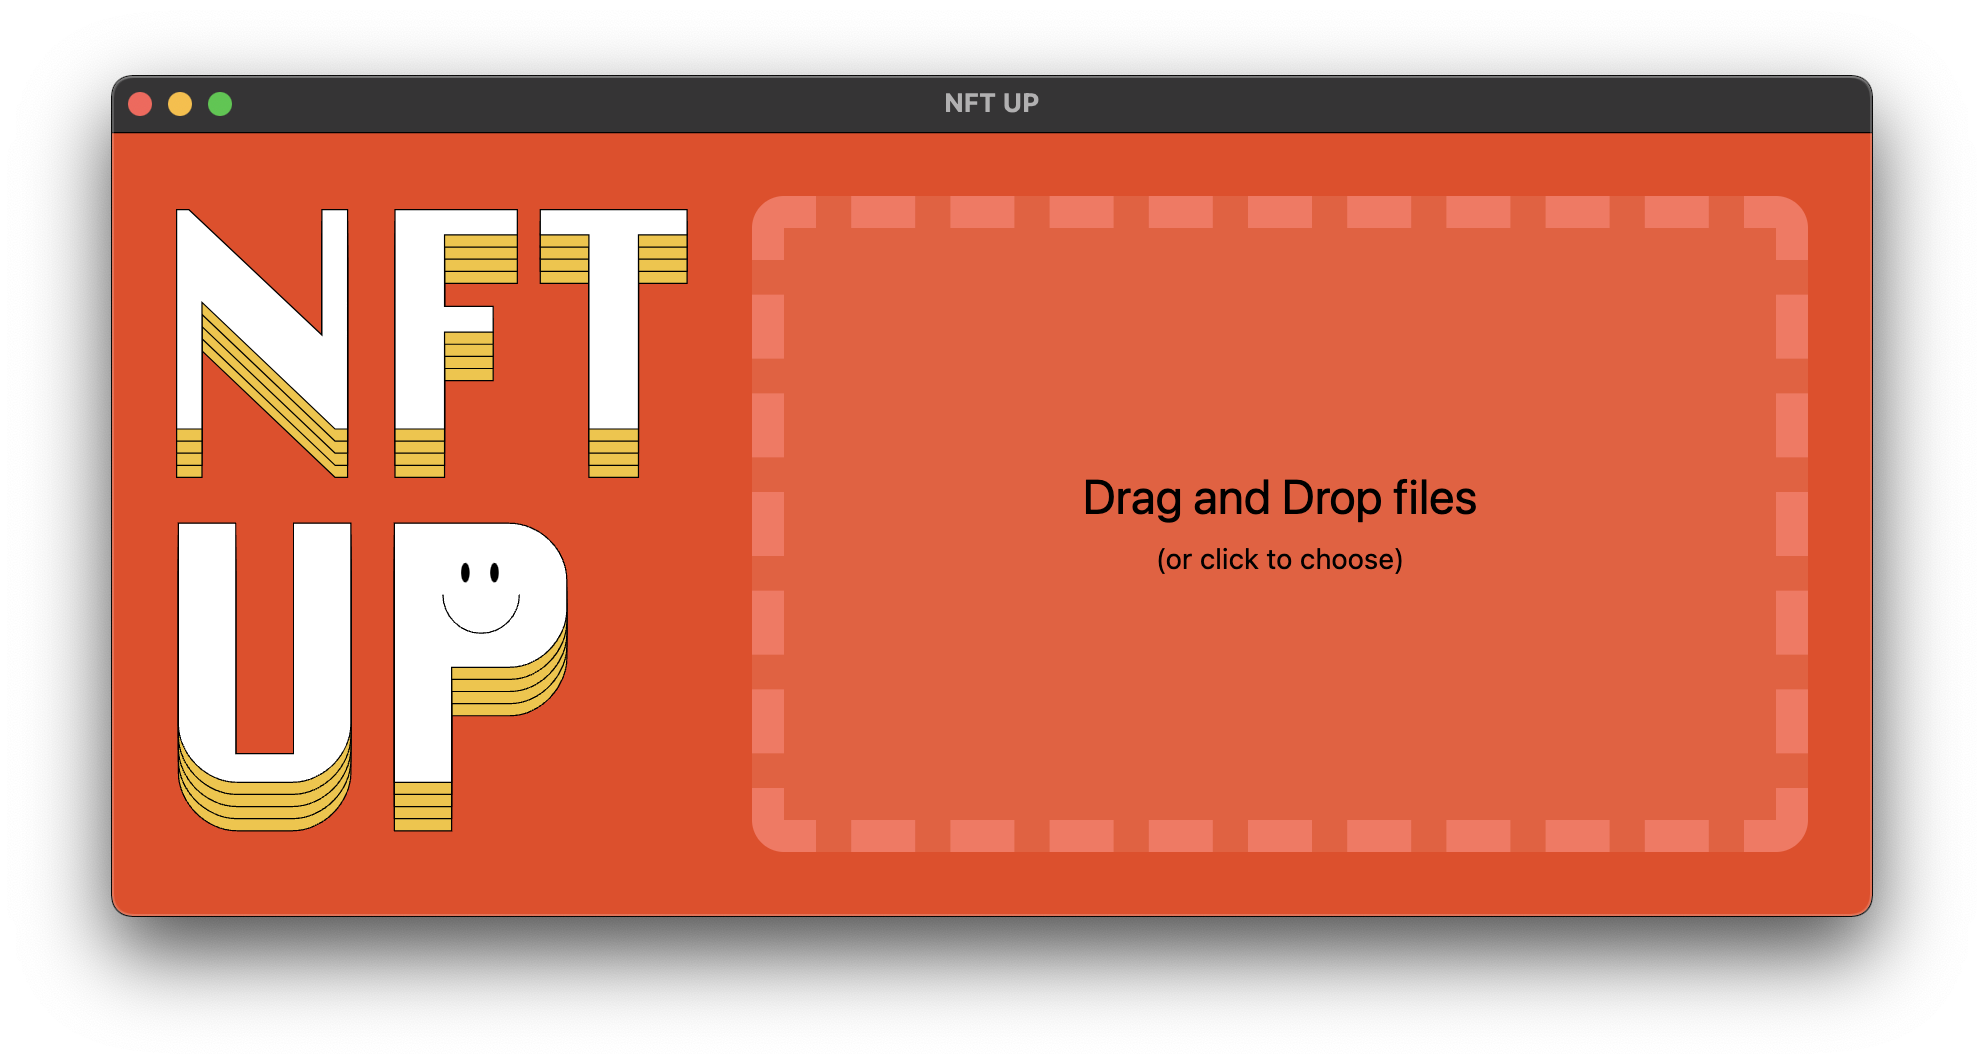
- Download and install NFT Storage's desktop application NFTUp for your OS
- Launch the application.
Uploading The Media File
Let's first create a directory called media and then add the image file(s) to it:
-
If all NFTs have the same image create a single image called
0.pngin/media -
If each NFT points to the same image file create one image for each token id: 0.png, 1.png, 2.png...
Then:
- Open the NFTUp application
- Drag and drop the
mediadirectory - Paste the API Key that you obtained from the Setup
- Wait for the upload to complete
- Copy and save the Gateway URL URI:
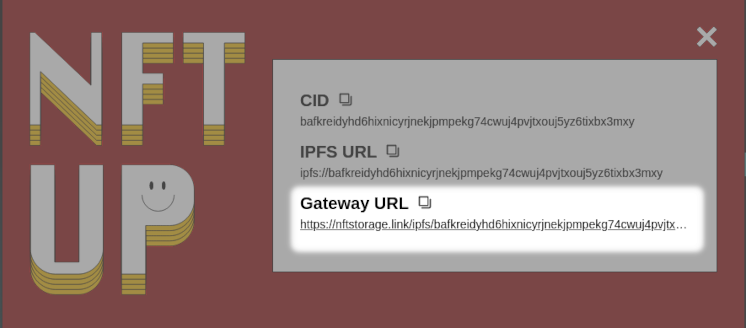
- Example URL:
https://nftstorage.link/ipfs/bafybeicm4hja3ty6jq52nsredyluviugp5d5ekos4cy4337cp5adj5aru4
Creating The NFT's Metadata file:
Here are the steps to create the metadata file:
- Create a directory called
metadata - Inside the directory, create a file called
0(no file extension) - The contents of the
0file should look something like this.
{
  "name": "street-art #294",
  "description": "Street art - CC BY 2.0 - https://www.flickr.com/photos/adulau/",
  "image": "https://bafybeicm4hja3ty6jq52nsredyluviugp5d5ekos4cy4337cp5adj5aru4.ipfs.nftstorage.link/0.jpg"
}
The image field should be a concatenation of the Gateway URL from the previous step and the first image file (eg: 0.png)
- Assuming all NFTs will have the same metadata, we can batch-copy the'0
file to1,2,3, ...9999using this command in ourTerminal. This command should be run from within the/metadata` directory. This assumes that you don't plan on minting more than 10,000 NFTs.
for i in {1..9999}; do cp 0 $i; done
- You should now have 10,000 files in
/metadatanamed 0,1,...,9999
Note:
The process explained above saves you a lot of time when preparing for large NFT "drops".
Behind the scene, when you mint x amount of ERC-721s (
mint_quantity), Co:Create assigns automatically the right metadata files (0,1,2...) to each token.
Uploading The Metadata Files
1. Upload the /metadata using NFT Up
/metadata using NFT Up2. Copy and save the Gateway URL
- Example link:
https://nftstorage.link/ipfs/bafybeiasv4llnkervuprzfte5sulodkzobcmpfc7ldwybdwiqq5ywbbstu
3. Add a trailing slash to the gateway URL.
It should now look like this: https://nftstorage.link/ipfs/bafybeiasv4llnkervuprzfte5sulodkzobcmpfc7ldwybdwiqq5ywbbst/
4. Verify that you can access the metadata JSON file by adding the token ID to the end of the gateway URL and navigating to that URL in your web browser.
JSON file by adding the token ID to the end of the gateway URL and navigating to that URL in your web browser.- Example link:
https://nftstorage.link/ipfs/bafybeiasv4llnkervuprzfte5sulodkzobcmpfc7ldwybdwiqq5ywbbstu/0 - This link should show you the
jsonmetadata for token id 0
Using The Files' URI
You can now use the IPFS base_uri of your metadata file(s) to mint your NFT(s). It needs to have a trailing slash. The URL for each token is base_uri+token_id.
This is an example of a base_uri, used when deploying a ERC-721 NFT contract:
https://nftstorage.link/ipfs/bafybeiasv4llnkervuprzfte5sulodkzobcmpfc7ldwybdwiqq5ywbbstu/
You can try deploying a test contract with the above parameter in your browser!
That's all for this post. If you want to take it to the next step, deploy and mint your first ERC-721, you can keep building here!
Get Help
If you get stuck at any time, reach out to us on Discord or contact us via email at [email protected].